Sometimes, you may not want to send an email you wrote to the other party immediately. You may need to send future emails for different reasons. It may not be appropriate to send work-related messages to your colleagues in the middle of the night or on a weekend break unless it is a special occasion. In such cases, you can prepare your email and postpone the sending process to a more suitable time. Gmail, one of the most important mail providers in the world, offers users an excellent solution for email exchange with several features it contains. Previously, people used different platforms to write an email in advance so as not to forget it or to have a message in the hands of the person who sent it at the right time.
Now, Gmail users can schedule an email to reach the recipient whenever they want. If you want to send an email later, it is a straightforward process with Gmail. In this article, you can find how to schedule and email on Gmail and how to edit them after scheduling them.
Schedule an Email in Gmail
You may need to send an email to someone living in a different time zone, or you may just want to send an email without setting the alarm. There can be many reasons, and the good news is you can easily schedule an email with your computer or mobile phone.
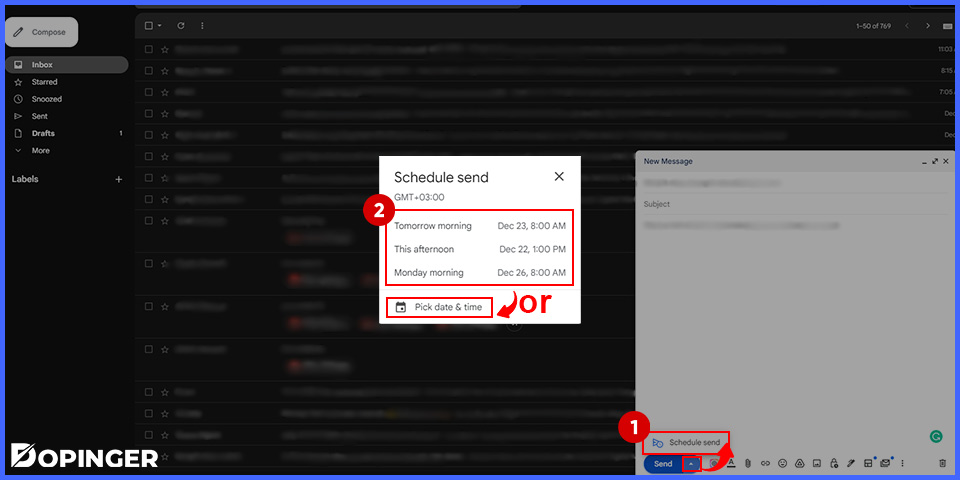
How to Schedule an Email on a Desktop
You can follow the steps below to schedule an email from your desktop web browser.

- Compose a new email in your account.
- Click the arrow next to the “Send” button.
- Choose one of the suggested times or click the “pick date&time” button to customize it.
- After choosing the posting time, click the “Schedule posting” option.
- Now your email is ready to be sent whenever you have scheduled it.
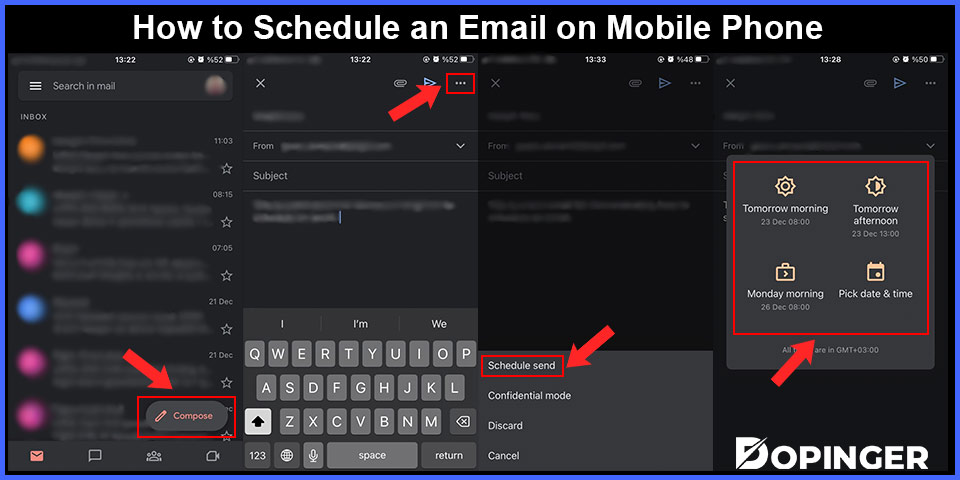
How to Schedule an Email on Mobile Phone
If you want to send a scheduled email with your mobile app, you can follow these steps;

- Open your Gmail app.
- Tap on the “Compose” button and write your email.
- After writing your email, tap on the three dots button.
- Select the “schedule send” option.
- Choose the suggested time or pick a date and time.
If you like to plan, this feature will be very useful for you.
View & Cancel Scheduled Emails
After scheduling an email, you may want to check it or cancel it. It is possible to view your scheduled emails in Gmail. You can use your computer or the mobile app.
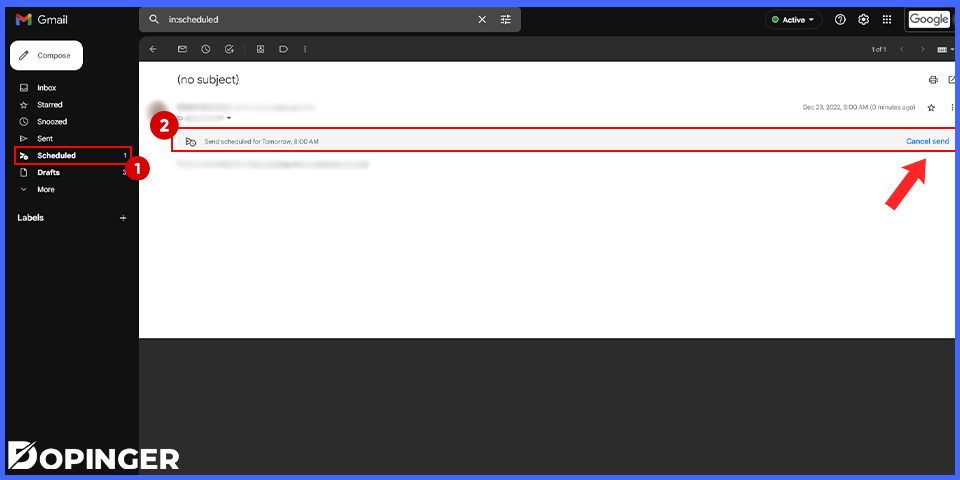
How to View & Cancel Scheduled Emails on a Desktop
If you need to check your scheduled emails or cancel them, here are the steps;

- After opening your Gmail account, click on the “more” button on the left bar.
- Find the “scheduled” option.
- You can view your scheduled emails in this section.
- If you want to cancel, click the email that you want to cancel and “cancel”.
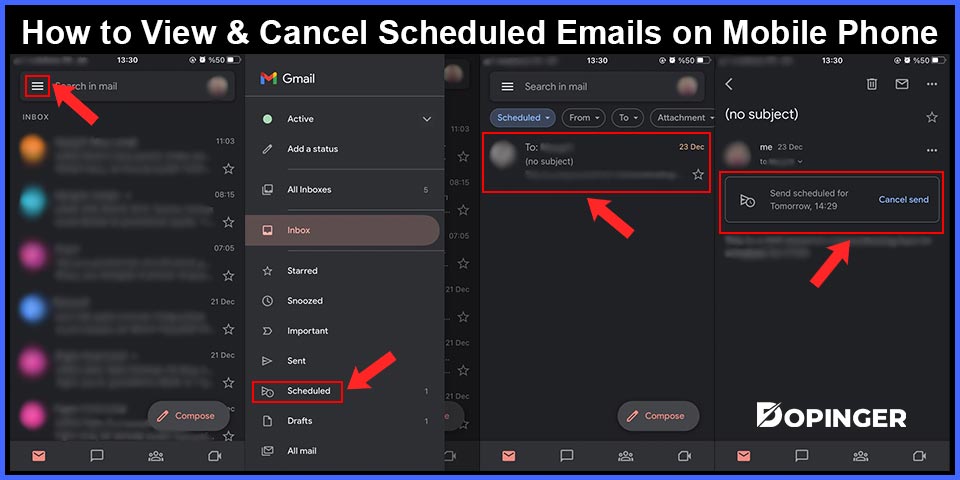
How to View & Cancel Scheduled Emails on Mobile Phone
You can follow the steps below to view or cancel your scheduled email on your mobile Gmail app;

- Tap on the three lines button.
- Scroll down and find the “scheduled” section.
- Tap on a scheduled email.
- You can see the time and cancel it if you wish.
Scheduling Emails in Gmail in Short
We have guided you through how to schedule an email in Gmail. Fortunately, you can do it inside Gmail. You don’t need a third-party app or anything else. Hopefully, the article above about scheduling an email in Gmail will be useful for you.
Frequently Asked Questions About
Using the email scheduling feature in your mobile Gmail account goes through almost the same steps. You do all the steps applied in the first step in the same way. Then, to switch to the “Schedule to send” section, it is necessary to click on the “three dots” section in the email creation section. In this way, you can easily schedule emails on your mobile app.
Suppose you want to cancel an email that you previously set to send with Gmail; follow this path. Access the menu from the Gmail icon and click on the Scheduled option. It will open the page with scheduled messages. You can select the desired message from the Messages to Send Later tab and cancel it by clicking on Cancel Send.
If you want to edit a scheduled email, go to Scheduled. Click on the email you want to edit. Click Cancel Send. Go to Drafts and edit the email.
You can schedule an email on your iPhone by clicking Schedule send after creating your email.
You can schedule up to 100 emails at once.


No comments to show.