API is an application programming interface that takes charge of various kinds of connections. It provides a network between computers, hardware, operating systems, etc., and usually relies on programming languages such as JavaScript. In the specific case of Google, the concept of Indexing API refers to the management of websites and pages. Do you need to know more about it? Definitely. This is how you will be able to better control your pages on the Google Index.
As an example, have you ever felt worried about having obsolete pages still listed as active? Without knowing how to discard them? That’s precisely our point here. So we will show the main steps to follow whenever dealing with indexing operations. It has become all the more necessary since a major update undertaken by Google in spring 2020. Nothing to be concerned about. The only big deal is to stay more alert about one’s own pages and report them on time. Just some basic precautions to avoid additional threats on rankings.
First of all, we will remember how the system works. Then we will see what you should do to get indexed.
How Does the Google Indexing System Work?
Ok, so since we have mentioned rankings in the previous paragraphs, it’s better to briefly refresh our memories. The Google Indexing API and the whole indexing system follow a logical order. Don’t forget that we are talking about a gigantic library here. There’s a ton of data Google has to sort out related to the billions of pages submitted. This is something to remember if you ever happen to lose patience regarding the whereabouts of your pages. So yes, the process does naturally take time. We can summarize the whole progression as follows:
- Discovery: At this phase, Google discovers the new pages. This is made possible through the information provided by XML sitemaps and updates on already existing pages.
- Crawling: Google starts to crawl the newly discovered pages and decides which ones it will add to the index.
- Indexing: Once it has fully understood what the new pages are about, Google saves and organizes them within a database.
- Serving: This phase is more commonly known as ranking. You may think of it as the ultimate purpose of the Indexing API. Whenever a user makes a specific inquiry, Google provides or serves the most relevant answer from its database. In other words, this is what occurs when you find the appropriate information related to your Web search.
That’s basically how ‘the indexing website on Google process’ works. So what would be your role in it? Well, you simply have to collaborate with Google by giving it clear instructions. Let’s see the details in the next section.
How to Index Your Website on Google
There are a bunch of commands that can make you pilot the Indexing API. All you have to do is to indicate what actions you wish to see performed. Don’t forget to start with the prerequisites as explained below.
Check the Prerequisites
These are the preparatory steps that will grant you access to the Google indexer site. You need to complete them before moving further.
Create a project
Go to Google Cloud Platform, which is a set of cloud computing services. You will see a menu located on the left with a section called ‘API and services’. Select ‘Dashboard’. Now the page should be ready, displaying a ‘Create a project’ option.
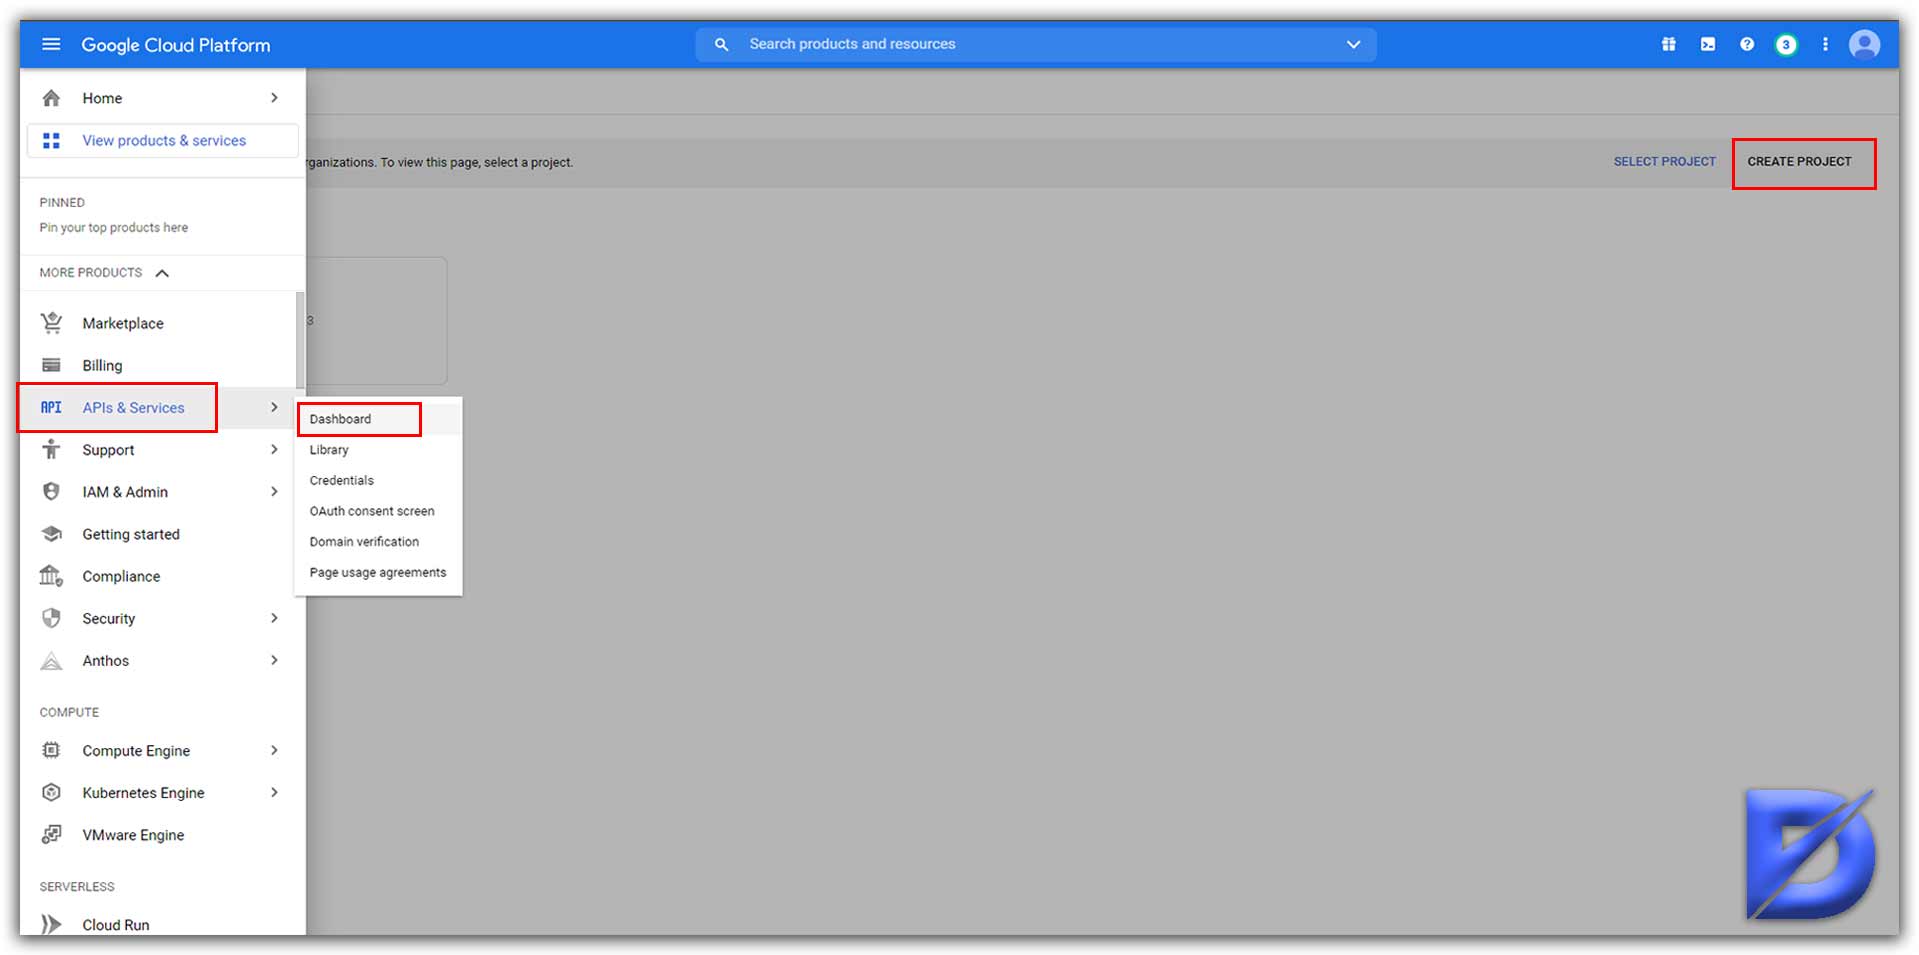
The purpose of this step is to inform Google about your client. By using the setup tools on that page, you will be officializing your application to the Google Indexing API.
Create a service account
Again on the main menu (left side of the page), select ‘IAM and administration’. Then select ‘Service Accounts’.
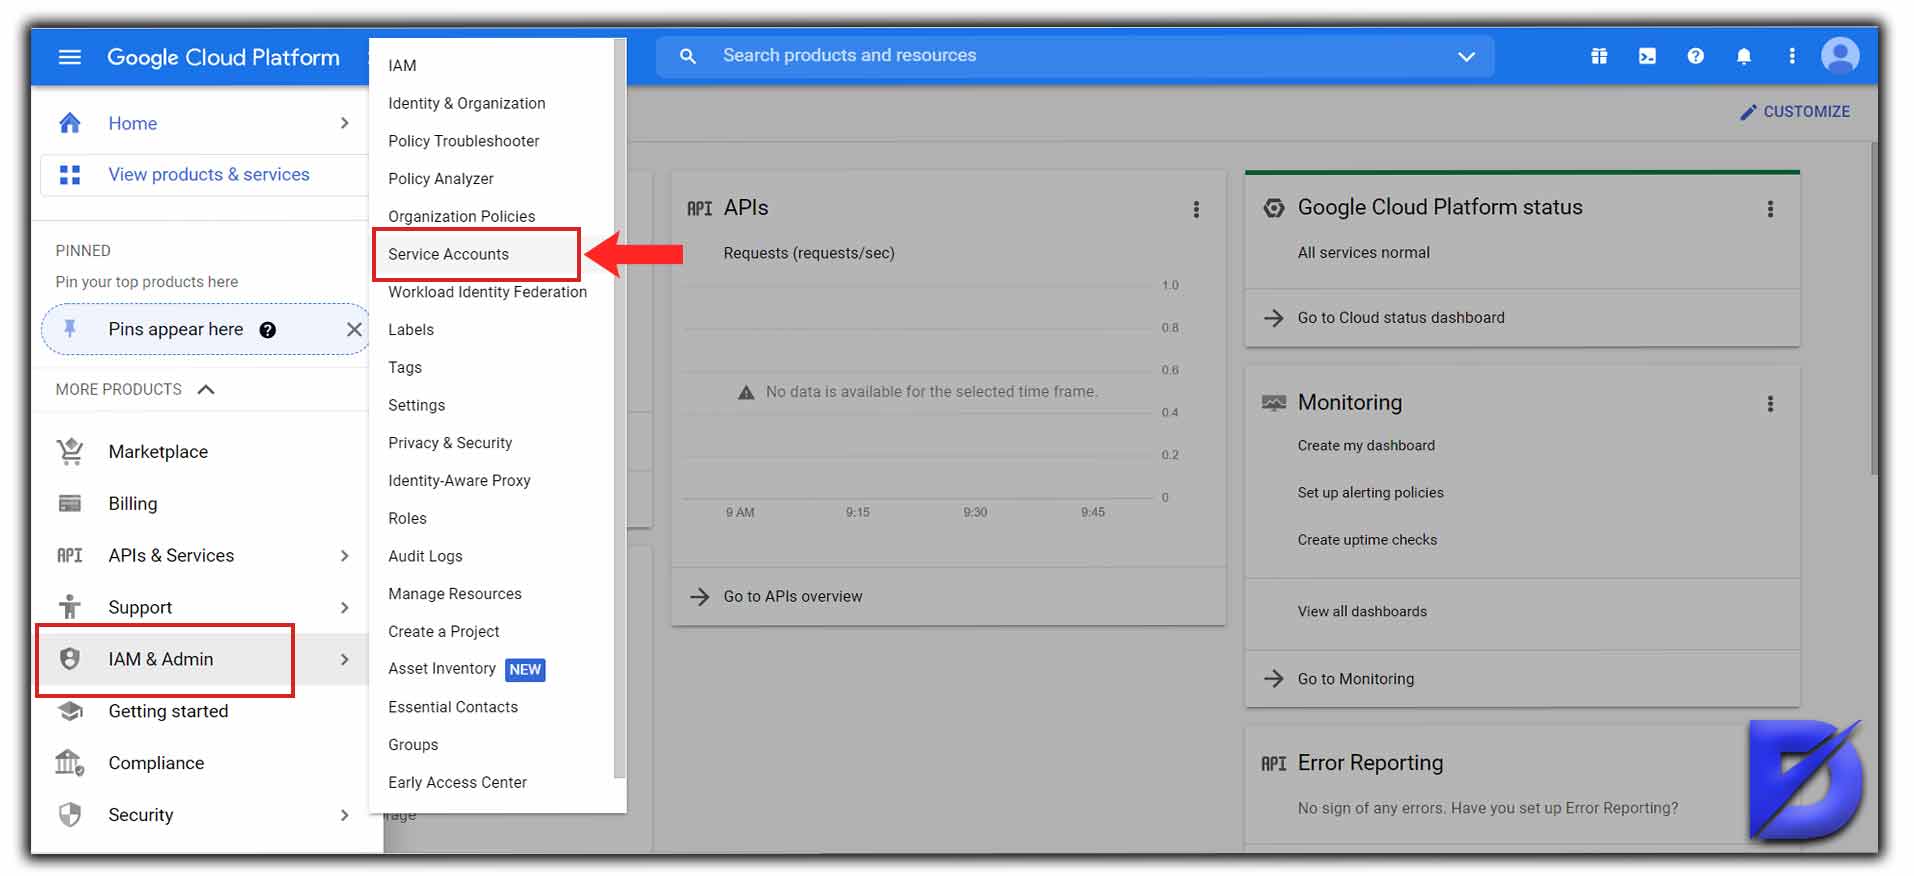
Here’s a simplified list of what to do next:
- Select ‘+ Create Service Account’. Type a name and description for your account. You can either go for the default ID assigned by the system or create a brand new one. Then click ‘Create’.
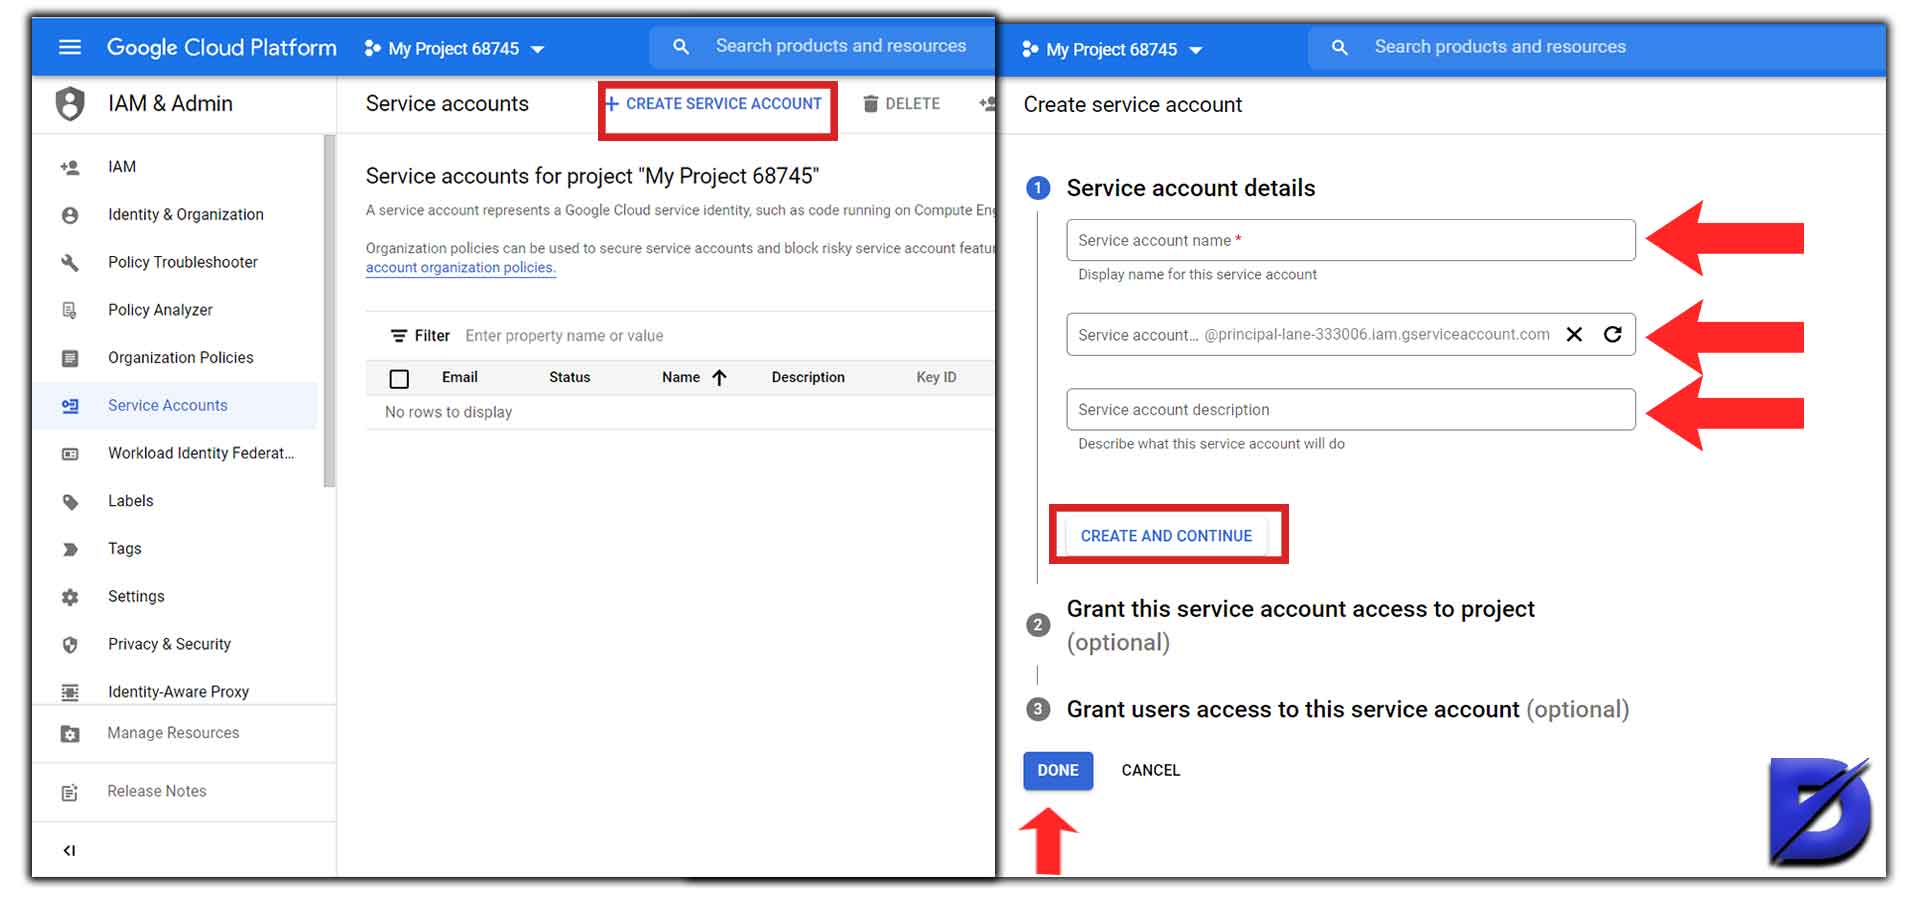
- You will be redirected to the ‘Service account permissions (optional)’ section. You may skip it by clicking ‘Continue’.
- A new screen called ‘Grant users access to this service account (optional)’ should appear. You may skip it too or choose a role, click ‘Done’ and complete this step.
- When you automatically return to the first page of the Service Accounts section, you can click on your email to create the key then click ‘Keys’ part or you may click ‘Actions’ at the end of the line and say ‘Manage Keys’.
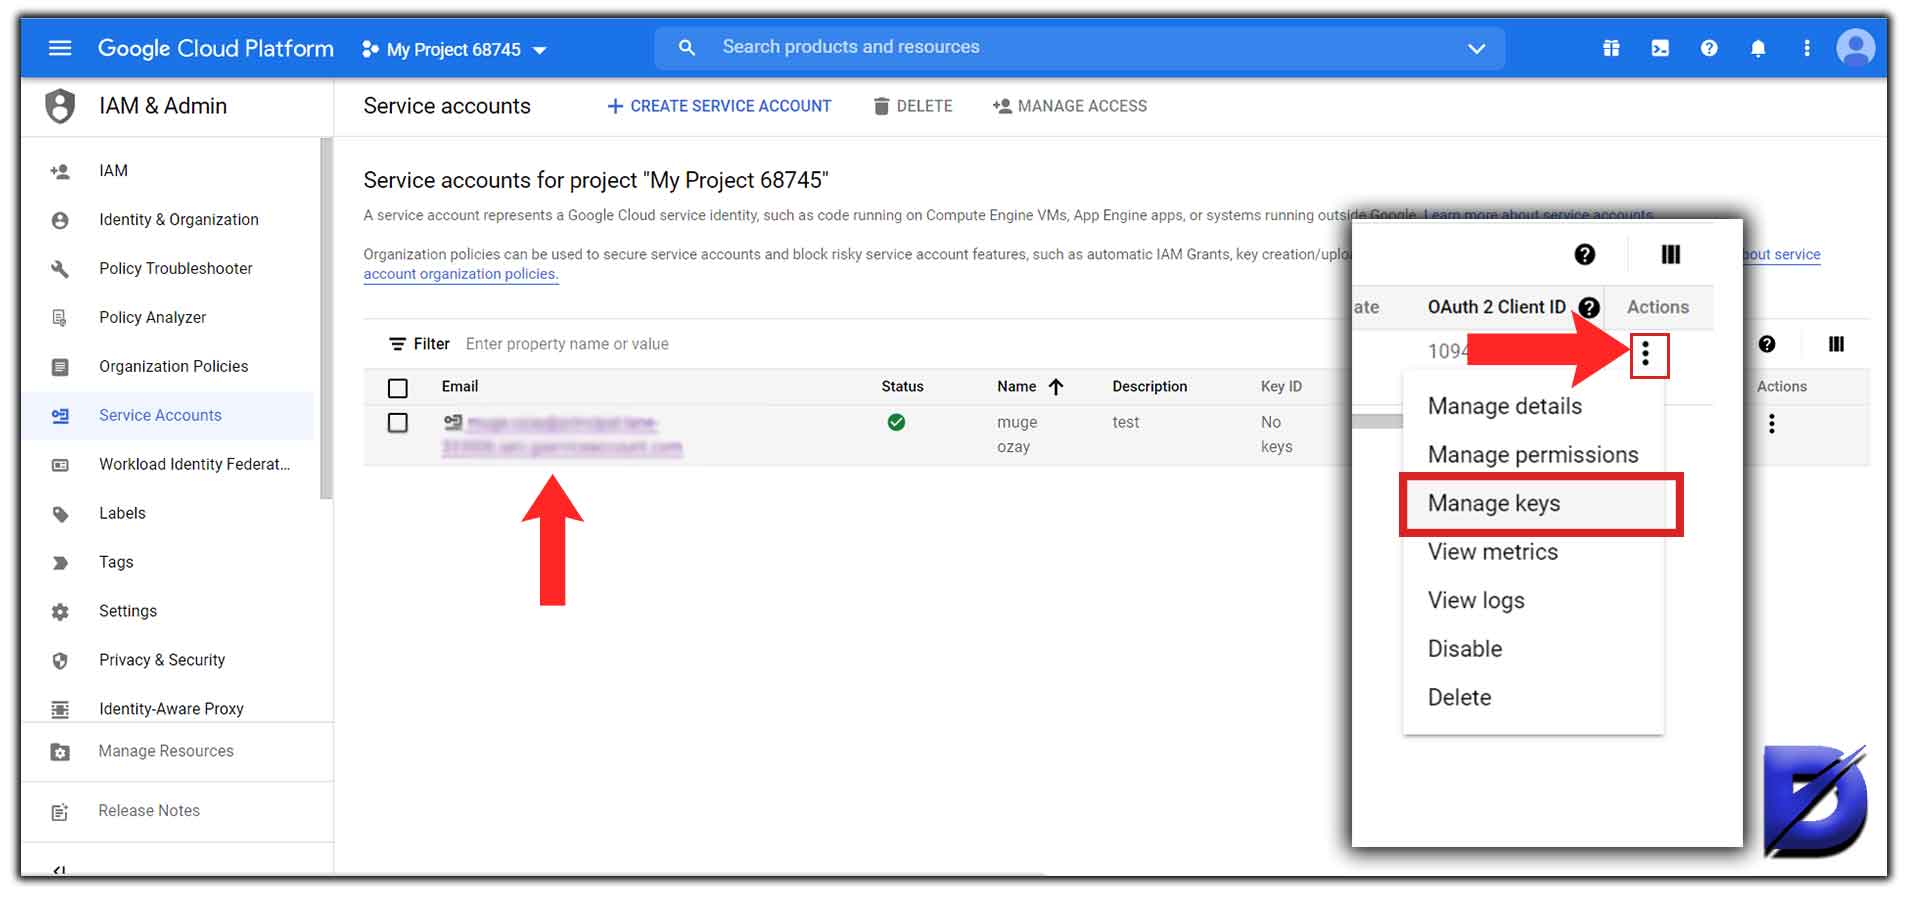
- Click ‘Add Key’ and select ‘Create New Key’.
- Select a format for your key in the side panel.
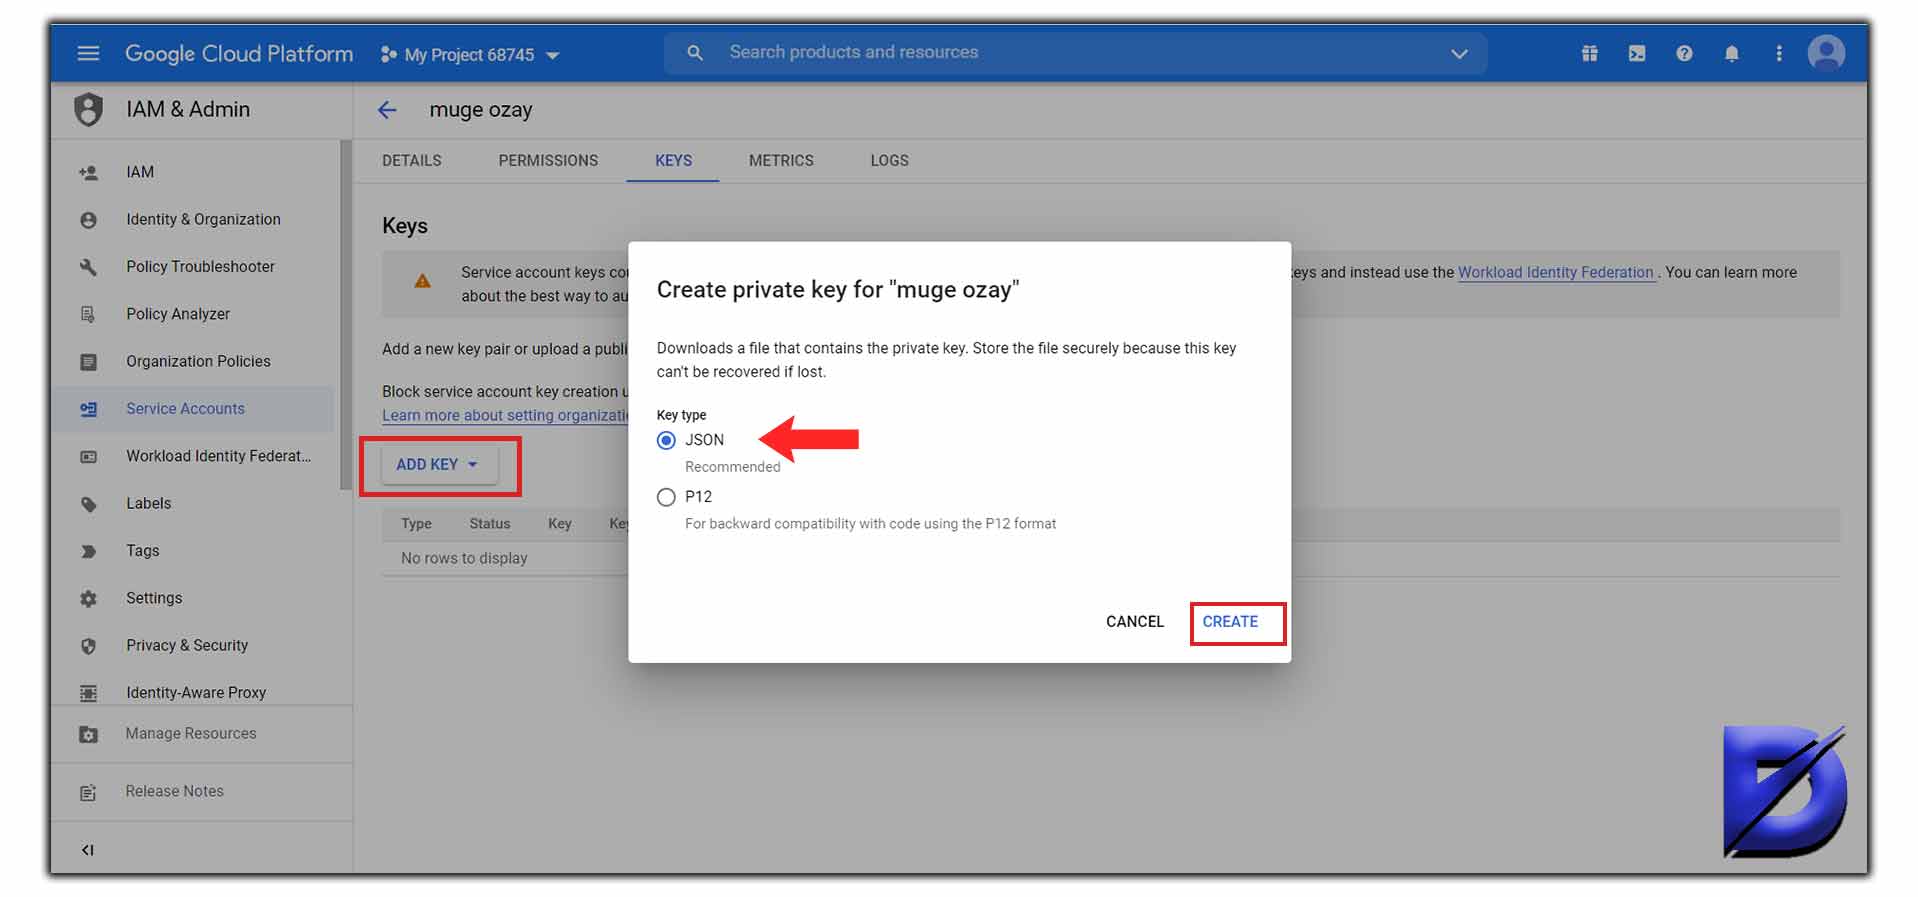
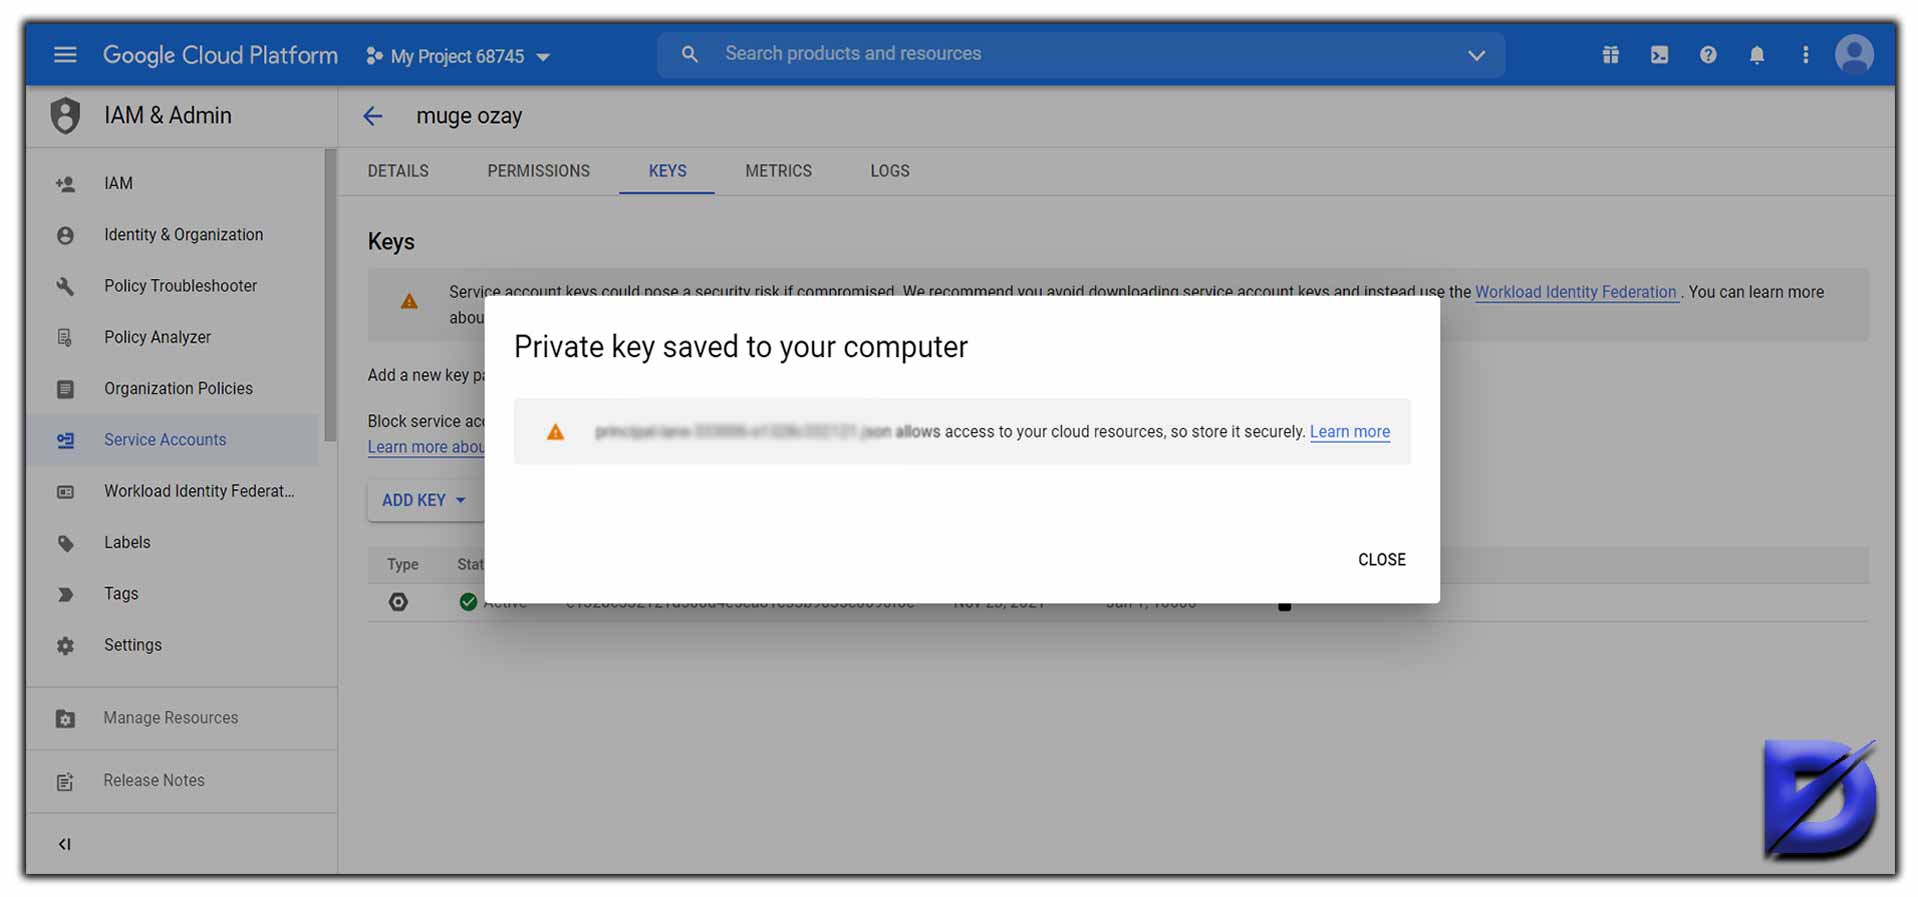
- Select ‘Create’. Your key pair is ready. You will see a ‘Private key saved to your computer’ dialogue. Close it and then select ‘Done’. You will be redirected to the main table of your service accounts.
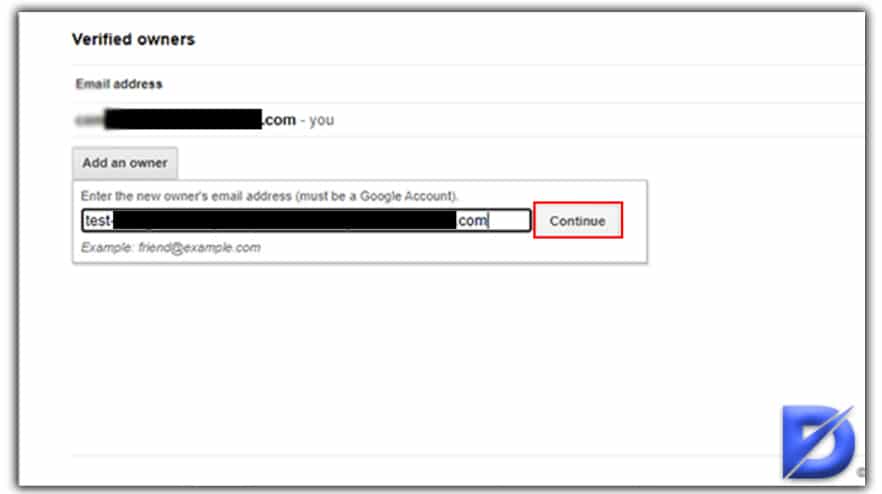
You now have an API key. After that, all you have to do is go to the Google Search Console and set the service account as the property owner. It is very easy to do this. Go to GSC>Settings>Users and Permissions>Manage property owners>Add owner. Copy the name of the service account that we created above, namely the “Service Account ID” and paste it here.
As the last step, when you press the ‘Continue’ button on the right, you complete all the processes. Now your Indexing API installation is complete and you have connected your project via GSC.
Summary of Google Indexing API
Google Indexing API is based on somewhat complex processes. This is certainly not a surprise, considering how comprehensive Google Index is. The good part is that users have the possibility to control at least some of those processes. As a website owner, you can establish a certain collaboration with Google and guide it by offering appropriate information about your pages. By doing so, now only will you save time, but you will also ensure better rankings.
Frequently Asked Questions About
The delay usually depends on the number of pages: For websites with less than 500 pages: 3 to 4 weeks. For websites with 500 to 25,000 pages: 2 to 3 months. For websites with more than 25,000 pages: 4 to 12 months.
Yes, you can group your API calls together into one single HTTP request. The biggest advantage of this method is to reduce the number of overheads. For further information, you may consult the language-specific pages in Google API Client Libraries (Java, JavaScript, PHP, etc.).
This is one of the error indicators. It means that you have exceeded your quota and need some more.
Yes, they are. As explained in the article, you need OAuth tokens. Please consult the OAuth 2.0 link provided under the ‘Obtain your access token’ section.
Yes, if it’s a user-managed one. However, you may also opt for Google Cloud-managed keys.





No comments to show.